
Hello Everyone!
I created a video for this project, but here is a written explanation of those of you who want to read the instructions.

Here are the materials:
Magazine Pages
Heavy cardboard
Santoro Mini Gorjuss
Trim
Hot Glue Gun
Wet Glue
Prills
Doily
Mini Staples and Stapler
Coffee Filter
Tattered Angels Shimmery Mist
Aluminum seal (repurposed)
Chameleon Alcohol Markers
Blazing Poppy Paper Collection HCDP1-255
Spellbinders Flower Play Stamps (and Die-cuts) SBS-001 (S6-032)
Heartfelt Creation's Botanical Wings Die-Cut HCD1-758
Deluxe Flower Shaping Kit HCST1-401
Deluxe Flower Shaping Kit HCST1-401
The base of my banner consists of magazine pages supported by heavy chipboard. I wanted to use this particular trim that has burgundy and beige shades, I also selected the Blazing Poppy collection that matched the trim. I used wet glue to attach the trim to my banner base, and to make sure it is not going anywhere I used my tiny stapler on the ends.
I wanted this banner to have a Spring feel so I selected a few mini Gorjuss that had pets and nature themes on them.
Next I stamped and die-cutted the flowers using Aryanna Blooms.

The papers I selected were in shades of ivory, green, black and red. I have a couple of clean coffee filter that I want to use in this project. I love the texture of the filter. Next I cut open the coffee filters and lay them open on my table. I laid down a few of the ivory flowers and sprayed them to give it a shimmery look and a small set I sprayed with red mist.
The coffee filter served as a catcher to pick up whatever color I was spraying. After I was done with the flowers, I finished spraying the coffee filters with Tattered Angels Glimmer Mist in three colors; Charcoal, Gold and Red. I wanted each of the girls to be different, so I stamped two of them on the coffee filter twice so I can piece piece the dress in a different shade from the rest of the image. To create dimension between the main image and the dress I applied a blob of silicone glue.

I wanted each banner to have a specific color used a different color family on each banner.
On the first banner I used daubers and chalk ink pad in yellow and pink.

To save time I try to stamp all of my pieces at the same time. I found an aluminum seal from a cereal container that I love to eat and I decided to use that in my project. I grabbed my black StazOn to stamps the flowers and die-cut them. I also decided to cut (without stamping) the leftover pieces of coffee filter.
I have all my pieces cut out and now it is time to shape them. I like to have my flowers in different sizes but I use the small ones the most. I prefer to use hot glue to created the flower buds using the smallest flower. I place a good size blob of glue and close the petals to create the bud, then I start to add the other sizes beneath it. On the large flowers I decided to use Dew Drops in the center instead of fully closing the flower. I adhered them using Glossy Accents to have a clear center. On the medium size flowers I am using either Prills or mini Dew drops. I love having swirls on my projects so for this one I selected the die-cut called Ornamental Add On (such a cool set!) and because I absolutely must use butterflies whenever I can, I grab one part of the coffee filter mostly with black spray and cut using the Botanical Wings dies.

The other two girls I stamped using light color papers from the Blazing Poppy paper pad. I found this tag from within the pad that had a small butterfly on and I stamped the dress part of the Gorjuss with the cat, so perfect! The girl seating with two birds next to her does not have a pieced together outfit, so I colored with alcohol marker only. I love using my Chameleon markers to paint. For adding highlights on the three girls, I selected green, lavender, brown, peach and orange on the cat to give him a whimsical look. I added wings to one of the girls, so an orange cat isn’t too strange, right?
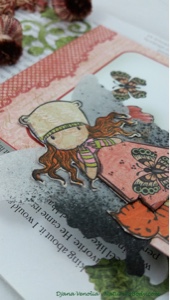
Now it is time to select which girl will go with which flowers and background. I knew for sure I wanted the girl with the umbrella to have the flowers on a oval paper. And the girl with the butterfly dress and wings was an easy match with the butterfly paper. So I had one paper to host the girl with birds. She is in a seating position and because she is so small she would have been lost on a busy background. To solve my problem I cut half of the circle doily I had initially selected to place under her. It looked perfect.
I knew I wanted to use the coffee filter flowers on my base but I didn’t know where exactly they would land. To give myself flexibility for placement, I cut small pieces of cardboard and folded them into a triangle. I used hot glue to adhere it to the back of the flowers and the background. That allows me to have dimension and I can add my flowers wherever I want. I am gluing the background flowers using Mod Podge which serves as glue and sealer.

The banner on the far left I decided to use the brown and red flowers over the magazine paper because it looked great with the chalk colors. The banner on the center had the red and green flowers and a title to draw attention to the piece. The banner on the right I have the girl with wings, charcoal black, ivory and the aluminum flowers I used a mixture of flat and 3D flowers to give the piece dimension.

I am so happy with how my banner turned out. The colors were definitely challenging ones but I think I pulled everything together :-)

No comments:
Post a Comment